Original tutorial by Loiva
Thank you Loiva for the permission to translate your tutorial.
Translated by Marie Nickol.
You will find the original tutorial here:

This tutorial is a personal creation by Loiva.
Any resemblance with another one would only be pure coincidence.
Thank you for the respect of Loiva’s work and the tubers work.
These translations are mine and are intended for personal use only and it is forbidden to copy part or all of it.
You can use this tutorial for PSP lessons but please put the link back to it.
Do not hesitate to let Loiva or me know if you have any problem with the present tutorial.

Materials used:
Disclaimer: Modifying or renaming files or removing watermarks from the tubes of the original tubers provided in the materials and sharing them as your own or using them for sale online or otherwise is prohibited.
1 character tube by Calli
1 deco tube
1 selection
1 preset
Plugins used:
Mura's Meister / Copies and Perspective Tiling
Graphics Plus / Cross Shadow
Materials

This translation is written with PSP 2018 Ultimate, if you work with other versions some things might be different but the result will be the same.
Note: In the latest versions of PSP the command Image-Mirror has become Image - Mirror - Mirror Horizontal
and Image-Flip has become Image - Mirror - Mirror Vertical
Preparations
Duplicate all the tubes and work with the copies to preserve the originals.
Place the selection into your Selections folder of PSP
Place the preset into your Presets folder of PSP
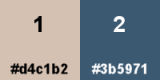
Colors used:
Note: From your own tubes choose one color as Foreground color and one color as Background color.
When
working with your own colors, adjust the Blend Mode/Opacity at your own discretion
Loiva chose the following colors:
Material Properties - Foreground: Set your Foreground color to color 1  #d4c1b2
Material Properties - Background: Set your Background color to color 2  #3b5971

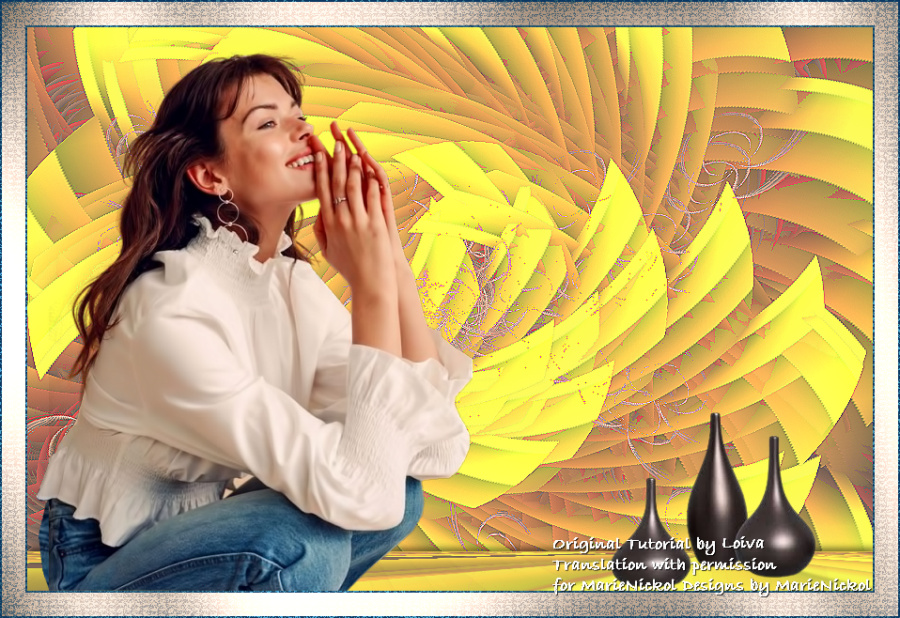
The Tutorial
Step 1
File - New - Open a new Transparent image 900 x 600 pixels
Note: If you use your own colors, choose a light color as Foreground color and a dark color as Background color from your own tube
Step 2
Flood fill tool / Fill in the layer with color 1 #d4c1b2
Layers - Duplicate
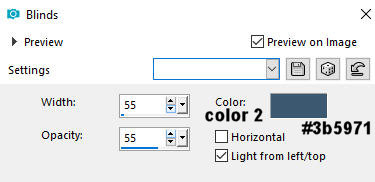
Step 3
Activate layer Copy of Raster 1
Effects - Texture Effects - Blinds
Step 4
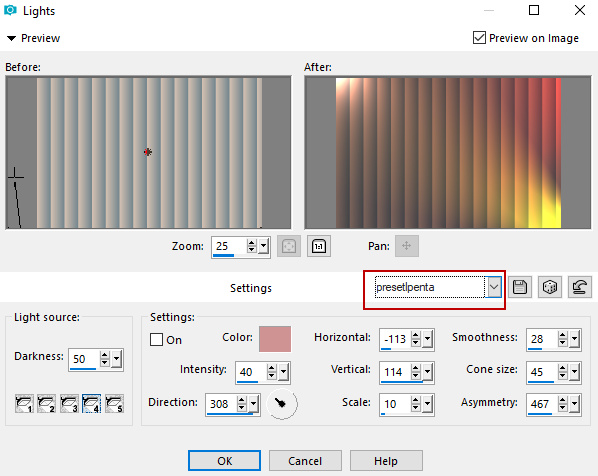
Effects - Illumination Effects - Lights
On the dropdown menu look for and load preset presetlpenta and click OK
Step 5
Effects - Geometric Effects - Pentagon

(Note: In my version below, I colorized here using Nik Software - Color Effex Pro)
Step 6
Selections - Load/Save Selection - Load Selection From Disk
Look for and load the selection - loivapenta
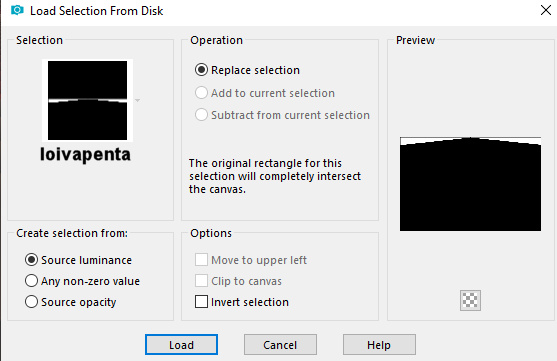
Press Delete on your keyboard
Selections - Select None
Step 7
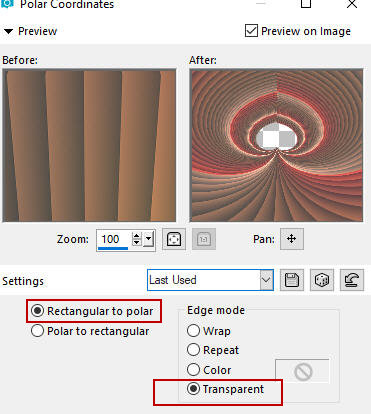
Effects - Distortion Effects - Polar Coordinates
Step 8
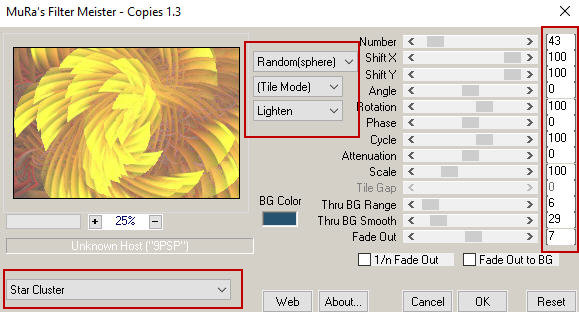
Effects - Plugins - Mura's Meister - Copies
(Note: First press Reset, then follow the settings below.)
On the dropdown menu choose preset Star Cluster with the following settings:
Step 9
Layers - Duplicate
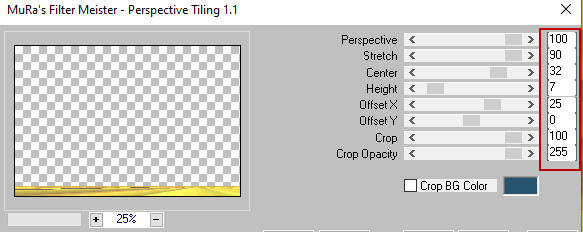
Effects - Plugins - Mura's Meister - Perspective Tiling
Use the following settings:
Step 10
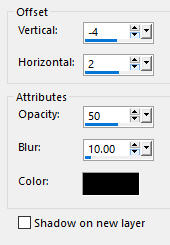
Effects - 3D Effects - Drop Shadow (-4/2/50/10/) color black #000000 - Shadow on new layer not checked
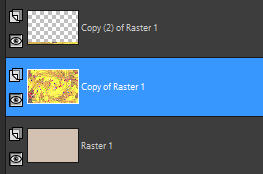
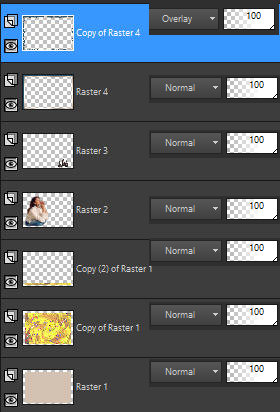
Your layers look like this:
Step 11
Activate the layer underneath - Copy of Raster 1
Effects - Edge Effects - Enhance
Step 12
Activate the top layer - Copy (2) of Raster 1
Open tube Calitubes-369mulheres (or your own tube)
Edit - Copy
Edit - Paste - Paste As New Layer on your working image
Image - Resize 80% Resize all layers not checked
Place the tube at the bottom left side as shown on the final result
Note: If you use your own tube - resize if necessary and move it to the left or to your liking
Step 13
Open the deco tube images-removebg-preview (1) (or your own tube)
Edit - Copy
Edit - Paste - Paste As New Layer on your working image
Place the tube at the bottom right side as shown on the final result
Note: If you use your own tube - resize if necessary and move it to the right or to your liking
Step 14
Layers - New Raster Layer
Selections - Select All
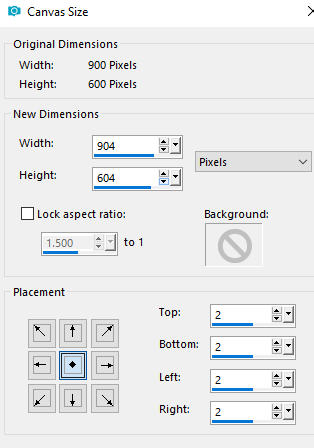
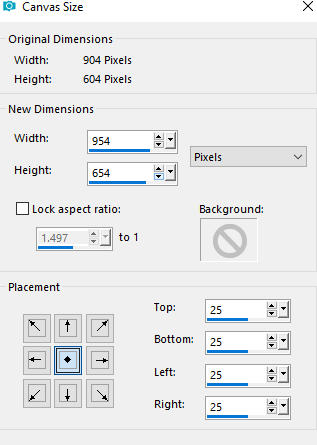
Image - Canvas Size
Selections - Invert
Flood fill tool / Fill in the Selection with the background color - Color 2 #3b5971
Note: When you use your own colors - fill in the selection with your dark color
Step 15
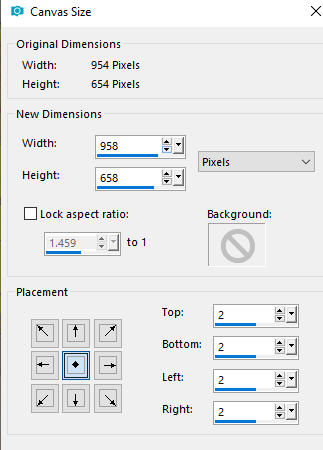
Selections - Select All
Image - Canvas Size
Selections - Invert
Flood fill tool / Fill in the Selection with the foreground color - Color 1 #d4c1b2
Note: When you use your own colors - fill in the selection with your light color
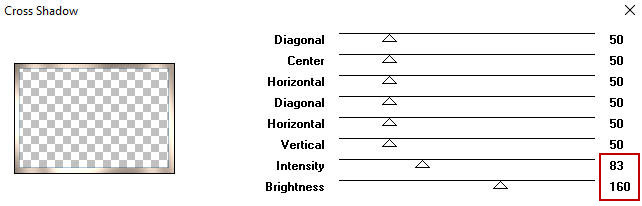
Effects - Plugins - Graphics Plus - Cross Shadow
Step 16
Selections - Select All
Image - Canvas Size
Selections - Invert
Flood fill tool / Fill in the Selection with the background color - Color 2 #3b5971
Note: When you use your own colors - fill in the selection with your dark color
Step 17
Selections - Select None
Layers - Duplicate
Step 18
Selections - Select All
Selections - Modify - Contract (Number of pixels 29)
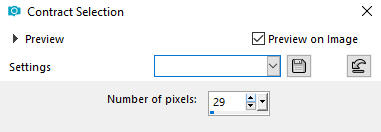
Selections - Invert
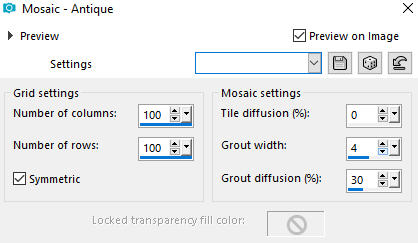
Effects - Texture Effects - Mosaic Antique
Use the following settings:
Step 19
Selections - Select None
In your Layer Properties set the Blend mode of this layer to Overlay
Your layers look like this now:
Layers - Merge - Merge Visible
Step 20
Layers - New Raster Layer
Add your name or watermark
Layers - Merge - Merge All (Flatten)
Image - Resize - 900 pixels width (the height will adapt)
File - Export - Save as JPG file
~~~~~~~
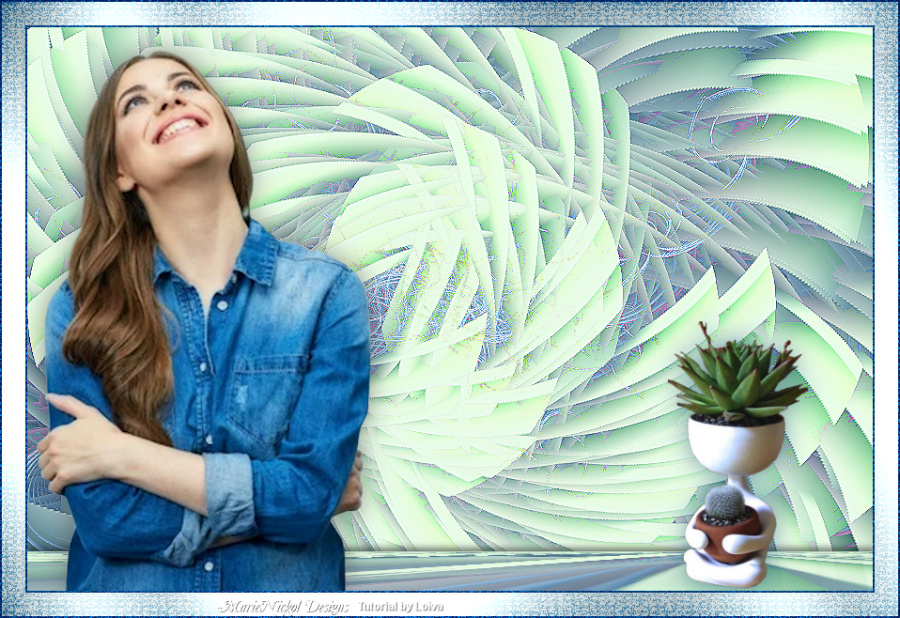
My version with my own woman tube and deco tube by Nena Silva