
Original tutorial by Jolcsi
Thank you Jolcsi for the permission to translate your tutorial.
Translated by Marie Nickol.
You will find the original tutorial here:
This tutorial is a personal creation by Jolsci.
Any resemblance with another one would only be pure coincidence.
Thank you for the respect of Jolcsi’s work and the tubers work.
These translations are mine and are intended for personal use only and it is forbidden to copy part or all of it.
You can use this tutorial for PSP lessons but please put the link back to it.
Do not hesitate to let Jolcsi or me know if you have any problem with the present tutorial.

Materials used:
Disclaimer: Modifying or renaming files or removing watermarks from the tubes of the original tubers provided in the materials and sharing them as your own or using them for sale online or otherwise is prohibited.
1 character tube by Jolcsi
1 mask
1 misted image by Jolcsi
1 deco tube by Jolcsi
1 font
Plugins used:
Mehdi - Wavy Lab 1.1
Filters Unlimited 2.0 - VM Distortion - Radial Pox
Filters Unlimited 2.0 - VM Distortion - Radiator II
Filters Unlimited 2.0 - &<Bkg Desinger sf10I> - Cruncher
Filters Unlimited 2.0 - Paper Textures - Canvas, Medium
Flaming Pear - Flexify 2
Mura's Meister - Perspective Tiling and Pole Transform
Mura's Seamless - Shift at Random
You can find my plugins page - Here
Materials

The original tutorial is written on PSP 2020.
This translation is written with PSP 2020.
If you work with other versions some things might be different but the result will be the same.
Note: In the latest versions of PSP the command Image-Mirror has become Image - Mirror - Mirror Horizontal
and Image-Flip has become Image - Mirror - Mirror Vertical
Preparations
Duplicate all the tubes and work with the copies to preserve the originals.
If you don't already have the font provided in the materials, install it into your fonts folder of your operating system by clicking install on it when opened.
If you use a font viewer software, simply open it there. When your font viewer software and the font are opened together, the font will be available in your PSP program.
Colors used:

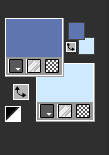
Material Properties - Foreground: Set your Foreground color to color 1  #5d76b0
Material Properties - Background: Set your Background color to color 2  #ceebfe
The Tutorial
Step 1
File - New - Open a new Transparent image 900 x 600 pixels
Effects - Plugins - Mehdi - Wavy Lab 1.1
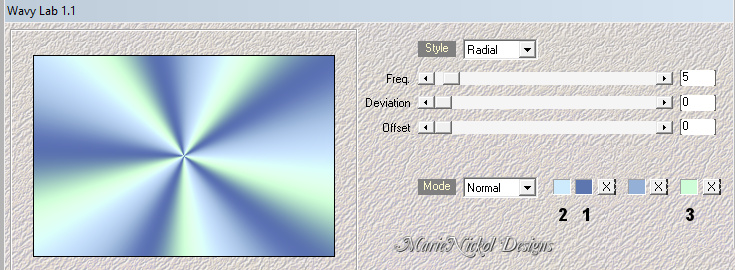
Adjust - Blur - Gaussian Blur (Radius 30)

Step 2
Effects - Plugins - <I.C.NET Software> - Filters Unlimited 2.0 -VM Distortion - Radial Pox (default settings)
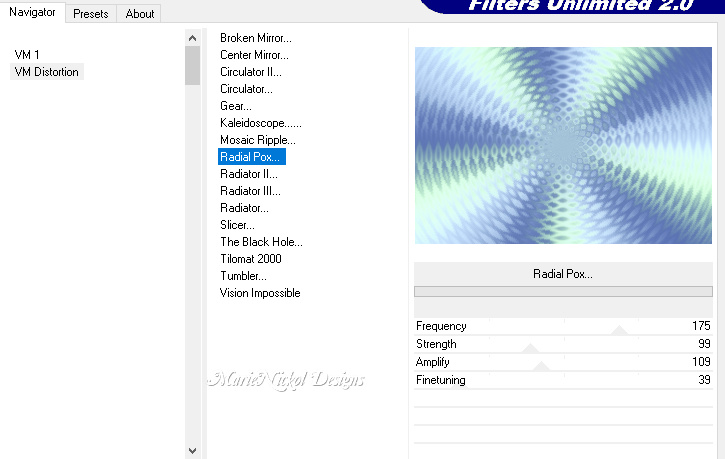
Repeat: Effects - Plugins - <I.C.NET Software> - Filters Unlimited 2.0 -VM Distortion - Radial Pox (default settings)
Effects - Plugins - <I.C.NET Software> - Filters Unlimited 2.0 -VM Distortion -Radiator II (default settings)
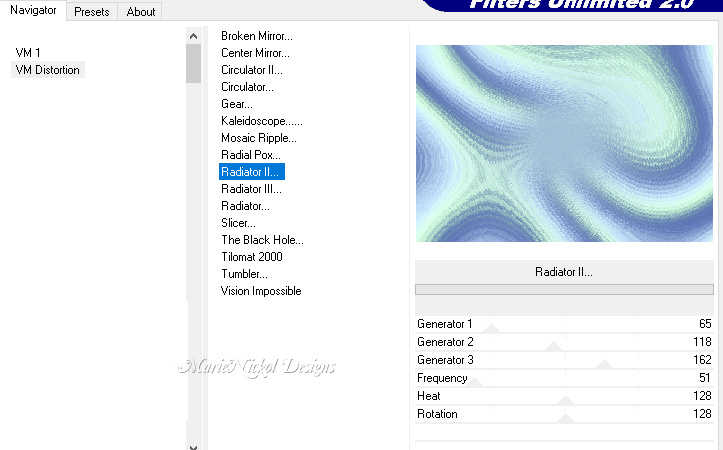
Effects - Plugins - <I.C.NET Software> - Filters Unlimited 2.0 - &<Bkg Desinger sf10I> - Cruncher (default settings)
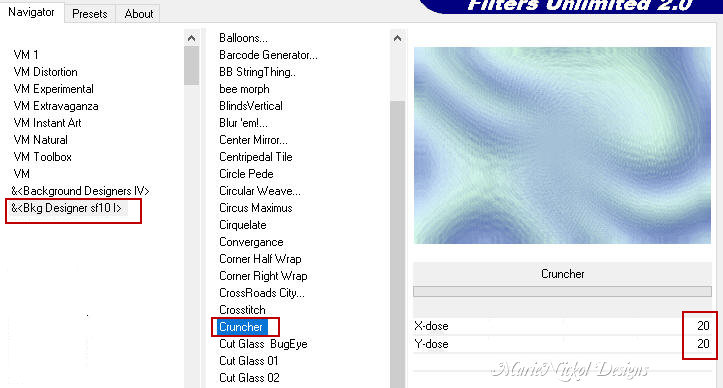
Adjust - Sharpness- Sharpen
Effects - Plugins - <I.C.NET Software> - Filters Unlimited 2.0 - Paper Textures - Canvas, Medium
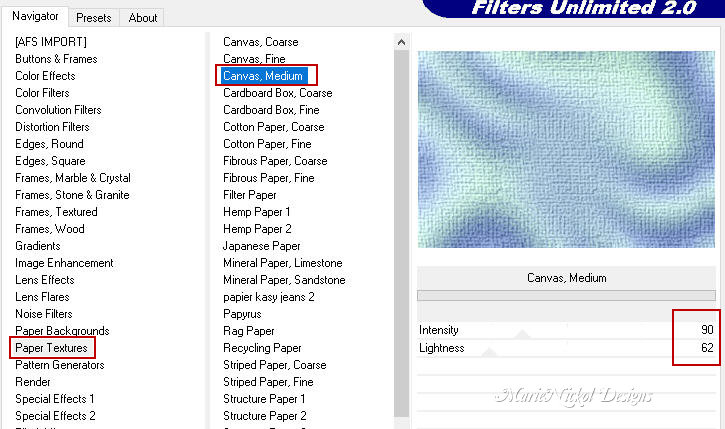
Step 3
Layers - Duplicate
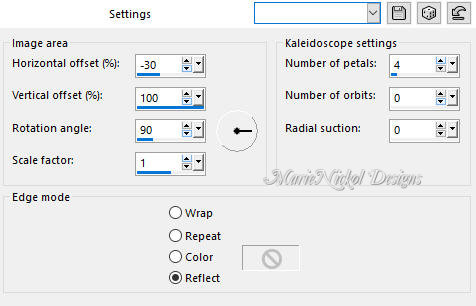
Effects - Reflection Effects - Kaleidoscope
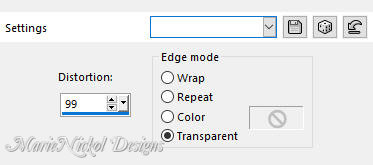
Effects - Geometric Effects - Perspective Horizontal
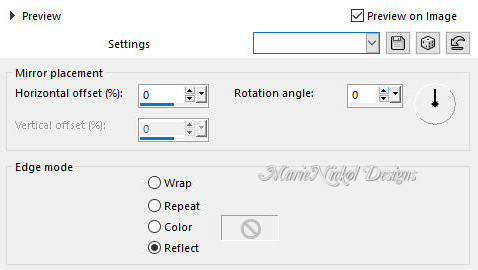
Effects - Reflection Effects - Rotating Mirror
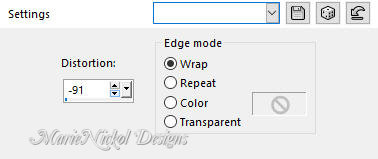
Effects - Geometric Effects - Perspective Vertical
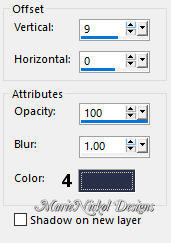
Effects - 3D Effects - Drop Shadow (9/0/100/1) - Shadow on new layer not checked - color 4  #293149
Step 4
Layers - Duplicate
Activate the Pick Tool (K) 
Enter these values for positions X and Y on the Toolbar
X: 0.00 Y: 214.00

Press M on your keyboard to release the Pick Tool
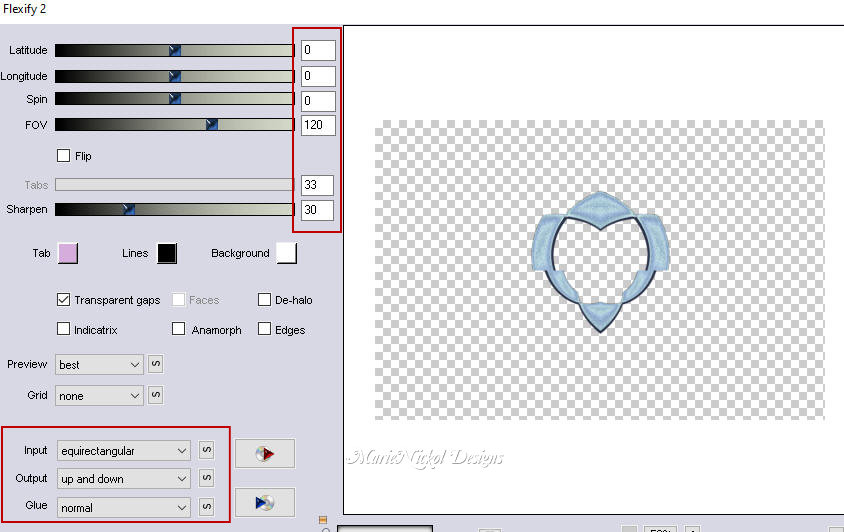
Effects - Plugins - Flaming Pear - Flexify 2
Step 5
Activate the Magic Wand  (Tolerance 0 and Feather 0)
Select the center empty space
Layers - New Raster Layer
Effects - Plugins - Mehdi - Wavy Lab 1.1 (the same settings as above in Item 1 - settings are still in memory)
Adjust - Blur - Gaussian Blur (Radius 15)

Layers - New Raster Layer
Open the misted tube - jolcsi_virág
Edit - Copy
Edit - Paste - Paste into Selection on your working image
Adjust - Sharpness- Sharpen
Selections - Select None
Layers - Merge - Merge Down (2 times)
Step 6
Activate the bottom layer - Raster 1
Layers - Duplicate
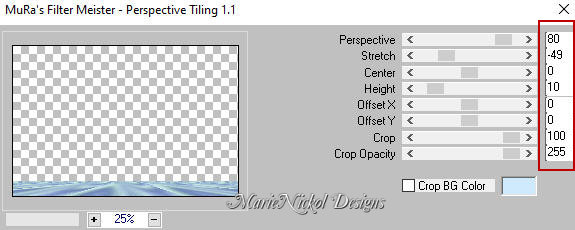
Effects - Plugins - MuRa's Meister - Perspective Tiling
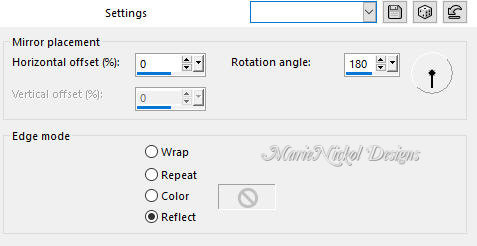
Effects - Reflection Effects - Rotating Mirror
Activate the Magic Wand  (Tolerance 0 and Feather 0)
Select the empty space
Selections - Modify - Feather - Feather amount 20

Press the Delete key on your keyboard once
Selections - Select None
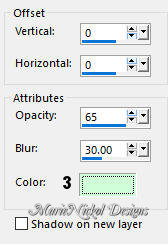
Effects - 3D Effects - Drop Shadow (0/0/65/30) - Shadow on new layer not checked - color 3  #cefed8
Step 7
Activate the bottom layer - Raster 1
Adjust - Blur - Radial Blur

Layers - New Raster Layer
Flood fill tool /Fill in the Layer with the Foregound Color - color 1  #5d76b0
Step 8
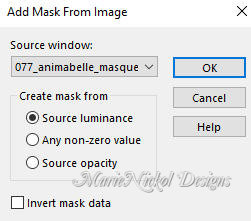
Open mask - 077_animabelle_masques
Layers - New Mask Layer - From Image (Invert mask data not checked)
Layers - Merge - Merge Group
Adjust - Sharpness- Sharpen
Step 9
Activate the top layer - Copy (2) of Raster 1
Open the character tube - j200
Remove the watermark
Edit - Copy
Edit - Paste - Paste As New Layer on your working image
Position it and add a drop shadow to your own liking.
Step 10
Open the deco tube - jolcsi_dísz
Remove the watermark
Edit - Copy
Edit - Paste - Paste As New Layer on your working image
Position it and add a drop shadow to your own liking.
Step 11
Image - Add Borders - 2px - Symmetric checked - color 1  #5d76b0
Image - Add Borders - 1px - Symmetric checked - color 2  #ceebfe
Selections - Select All
Image - Add Borders - 10px - Symmetric checked - color 1  #5d76b0
Selections - Invert
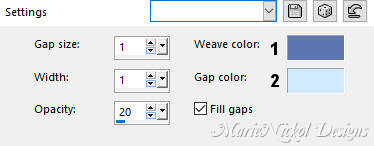
Effects - Texture Effects - Weave
Selections - Select None
Image - Add Borders - 1px - Symmetric checked - color 1  #5d76b0
Image - Add Borders - 1px - Symmetric checked - color 2  #ceebfe
Selections - Select All
Edit - Copy
Step 12
Image - Add Borders - 45px - Symmetric checked - color 2  #ceebfe
Selections - Invert
Edit - Paste - Paste into Selection
Adjust - Blur - Gaussian Blur (Radius 15)

Step 13
Layers - New Raster Layer
Effects - 3D Effects - Buttonize
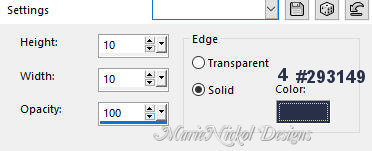
Effects - 3D Effects - Chisel

Selections - Select None
Step 14
Activate the Magic Wand Tool (Tolerance 0 and Feather 0)
Select the area between the two strips (the light blue color)
Layers - Merge - Merge Down
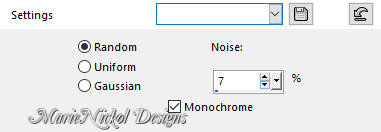
Adjust - Add/Remove Noise - Add Noise
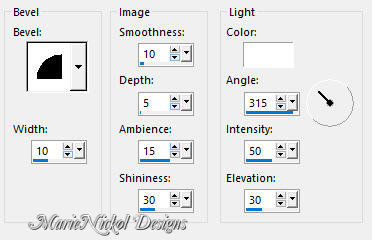
Effects - 3D Effects - Inner Bevel
Selections - Select None
Step 15
Switch the Material Color Properties
Set your Foreground color to color 2  #ceebfe
Set your Background color to color 1  #5d76b0
Activate the Text Tool  and set font Arial Black (included in the materials) - size 72 Pixels

Type the text "MELANI" on your keyboard
Layers - Convert to Raster Layer
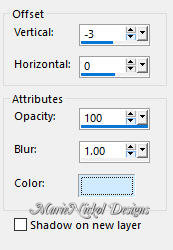
Effects - 3D Effects - Drop Shadow (-3/0/100/1) color 2  #ceebfe- Shadow on new layer not checked
Activate the Pick Tool (K) 
Enter these values for positions X and Y on the Toolbar
X: 358.00 Y: 490.00

Press M on your keyboard to release the Pick Tool
Effects - Plugins - MuRa's Meister - Pole Transform 2.1
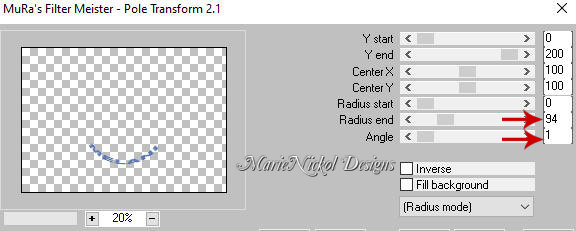
Image - Resize - 90% - Resize All Layers - Not Checked
Layers - Duplicate
Layers - Arrange - Move down
Effects - Plugins - MuRa's Seamless - Shift at Random (default settings)

Activate the top layer - Raster 1
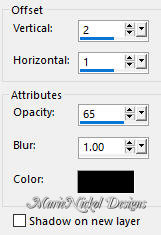
Effects - 3D Effects - Drop Shadow (2/1/65/1) color black #000000 - Shadow on new layer not checked
Adjust - Sharpness- Sharpen
Image - Add Borders - 1px - Symmetric checked - color 2  #ceebfe
Step 16
Layers - New Raster Layer
Add your name or watermark
Layers - Merge - Merge All (Flatten)
Image - Resize - 950 pixels width (the height will adapt)
File - Export - Save as JPG file
~~~~~~~
I hope you enjoyed this lesson.
If you do this tutorial please email your version to me
my email address -
~~~~~~~
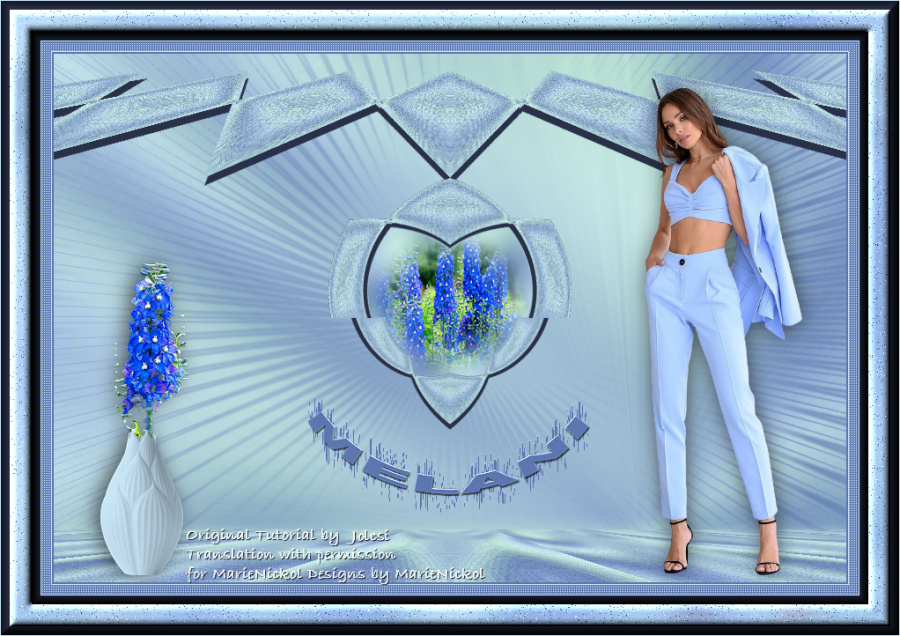
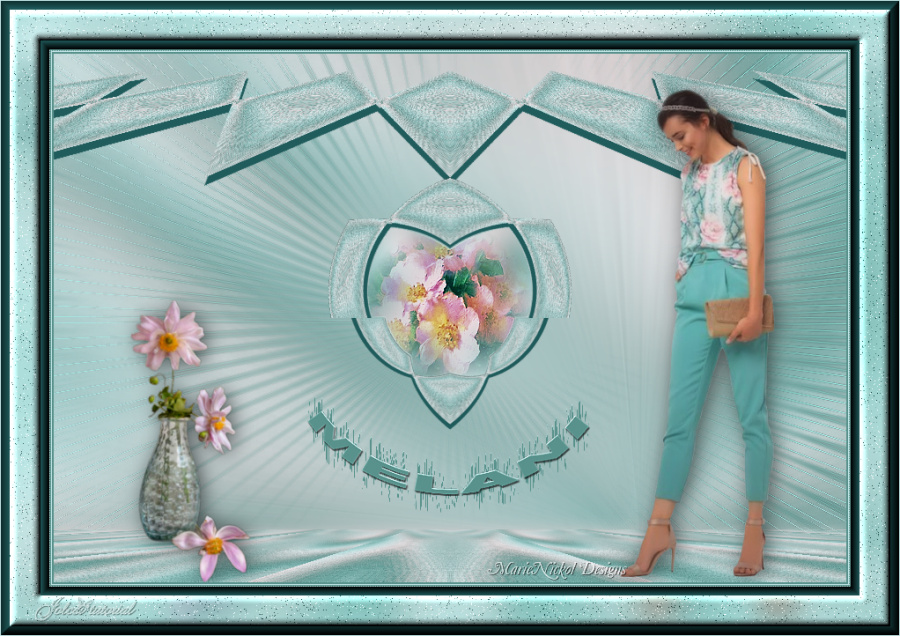
My version with my own woman tube and deco vase with flowers by Luz Cristina
~~~~~~~
Your Versions
~~~~~~~
