
Original tutorial by Anja
Thank you Anja for the permission to translate your tutorial.
Translated by Marie Nickol.
You will find the original tutorial here:

This tutorial is a personal creation by Anja.
Any resemblance with another one would only be pure coincidence.
Thank you for the respect of Anja’s work and the tubers work.
These translations are mine and are intended for personal use only and it is forbidden to copy part or all of it.
If you would like to use Anja's lesson for a PSP group,
Please contact Anja via psp.anja@gmail.com
Materials used:
Disclaimer: Modifying or renaming files or removing watermarks from the tubes of the original tubers provided in the materials
and sharing them as your own or using them for sale online or otherwise is prohibited.
1 character tube by Anja
2 tubes
1 mask
1 selection
2 presets
Plugins used:
Xero
Carolaine and Sensibility
Medhi
Filters Ulimited 2 - Bkg Designers sf10 III
MuRa's Meister
Alien Skin Eye Candy 5 - Impact
Optional - Xero - Porcelain
You can find my plugins page - Here
Materials
The original tutorial is written with PSP2020.
The present translation is written with PSP 2020.
If you work with other versions some things might be different but the result will be the same.
Note: In the latest versions of PSP the command Image-Mirror has become Image - Mirror - Mirror Horizontal
and Image-Flip has become Image - Mirror - Mirror Vertical
Note: I use a script for the old commands of Image-Mirror and Image-Flip
Note: I work with the old Material Properties - in PSP 2018, 2019, 2020
under File - Preferences - General Program Preferences - check Use classic Material Properties
Preparations
Double click on the Alien Skin Presets provided in the materials - they will automatically install in the appropriate filter for your PSP
Place the selection in the Selections folder of PSP
Place the mask in the Mask folder of PSP
Place the tubes in a folder of your choice.
Duplicate all the tubes and work with the copies to preserve the originals.
If you don't have the plugins install them into your Plugins folder for PSP
Colors used:
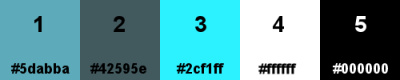
Color 1 - #5dabba ; Color 2 - #42595e ; Color 3 - #2cf1ff ; Color 4 - #ffffff; Color 5 - #000000
Note: When working with your own colors, adjust the Blend Mode/Opacity at your own discretion
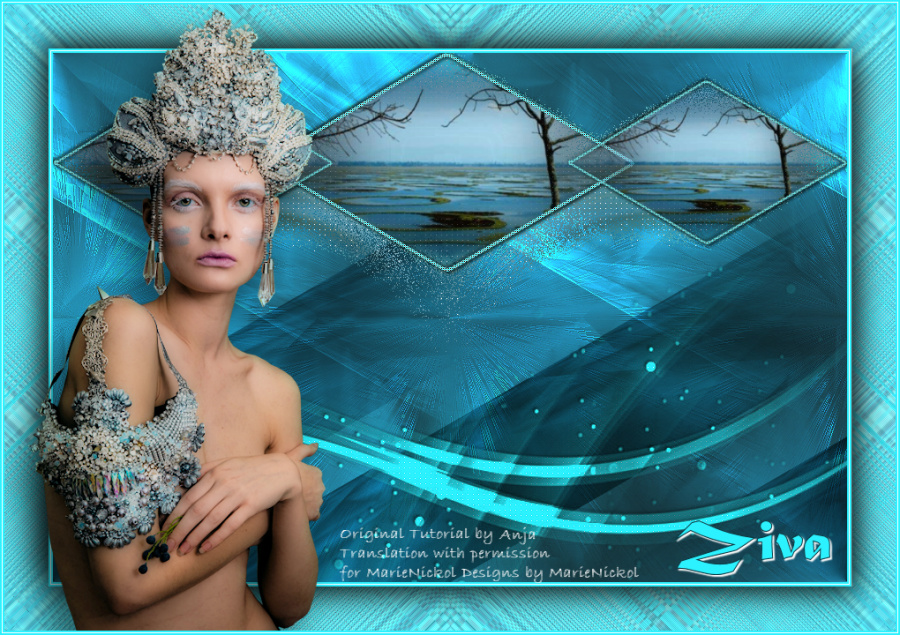
The Tutorial
Step 1
File - New - Open a new Transparent image 900 x 600 pixels
Step 2
Material Properties: Set your Foreground color to Color 1  #5dabba
Material Properties: Set your Background color to Color 2  #42595e
Step 3
Materials Properties: Set your Foreground Color to foreground-background Radial gradient with the following settings
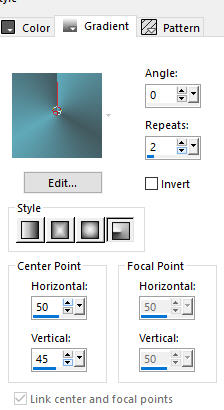
Flood fill tool / Fill in the layer with the gradient you just prepared
Step 4
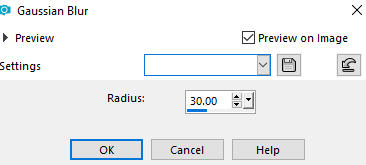
Adjust - Blur - Gaussian Blur (Radius 30)
Step 5
Layers - Duplicate
Step 6
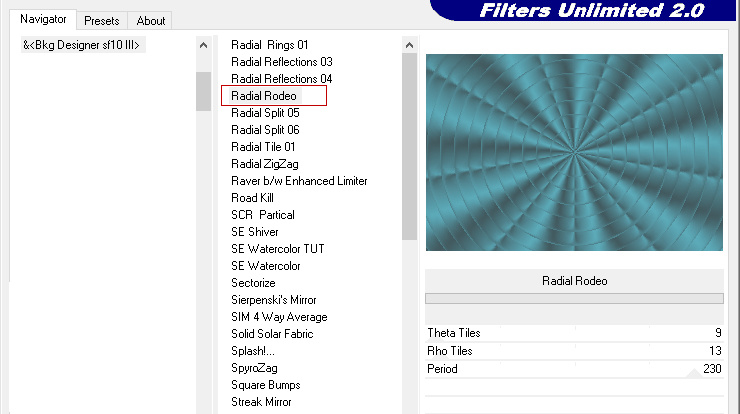
Effects - Plugins - <I.C.NET Software> - Filters Unlimited 2.0 - Bkg Designers sf10 III - Radial Rodeo (default settings)
Step 7
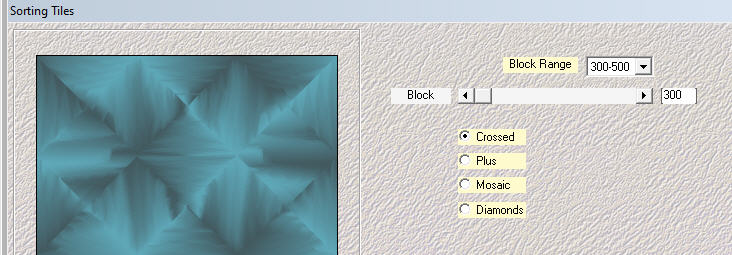
Effects - Plugins - Mehdi - Sorting Tiles
Step 8
In your Layer Properties - set the Blend mode to Multiply
Step 9
Layers - Duplicate
Step 10
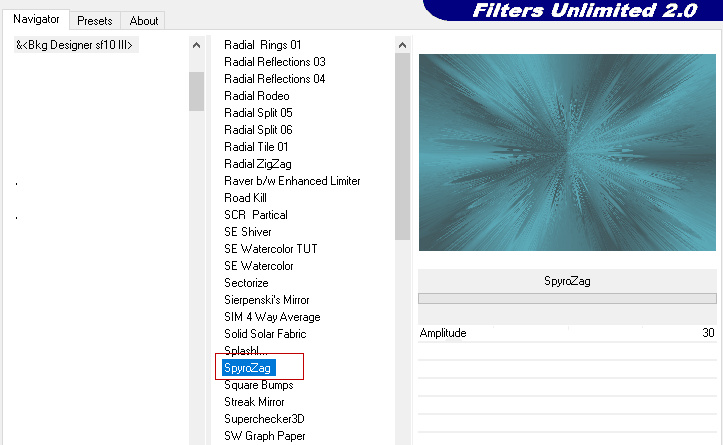
Effects - Plugins - <I.C.NET Software> - Filters Unlimited 2.0 - Bkg Designers sf10 III - SpyroZag
Step 11
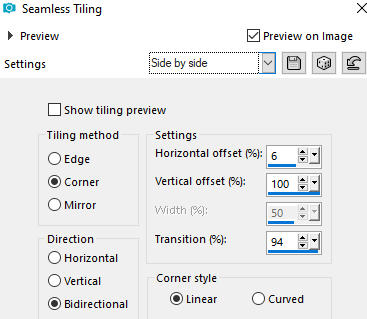
Effects - Image Effects - Seamless Tiling (Side by Side)
Step 12
In your Layer Properties - set the Blend mode to Dodge and the Opacity to 80%
Step 13
Effects - Edge Effects - Enhance
Step 14
Activate the second layer from the bottom - Copy of Raster 1
Step 15
Layers - Duplicate
Step 16
Layers - Arrange - Bring to Top
Step 17
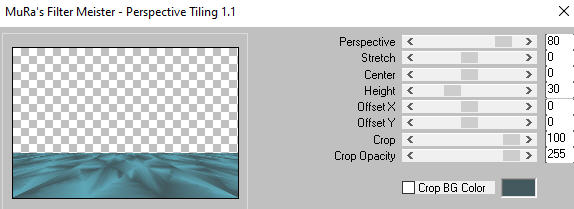
Effects - Plugins - MuRa's Meister - Perspective Tiling
Step 18
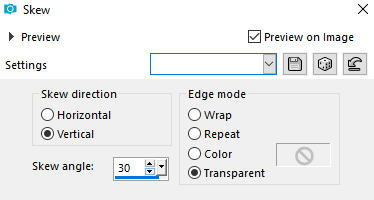
Effects - Geometric Effects - Skew
Step 19
Effects - Image Effects - Seamless Tiling (Side by Side)
Step 20
Layers - Duplicate
Step 21
Image - Mirror - Mirror Vertical (older versions Image-Flip)
Step 22
In your Layer Properties - set the Blend mode to Dodge and the Opacity to 85%
Step 23
Effects - Edge Effects - Enhance
Step 24
Layers - New Raster Layer
Step 25
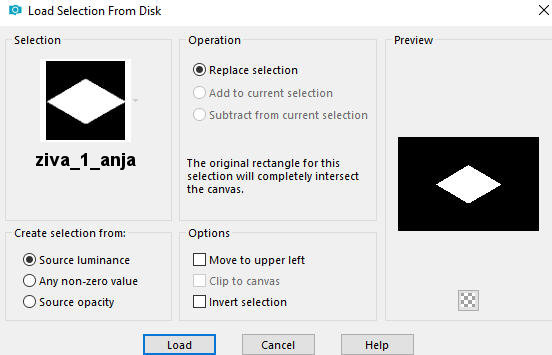
Selections - Load/Save Selection - Load Selection From Disk
Look for and load the selection - ziva_1_anja
Step 26
Open tube - landschap_blauw
Edit - Copy
Edit - Paste - Paste into Selection on your working image
Step 27
Selections - Modify - Select Selection Borders

Step 28
Layers - New Raster Layer
Step 29
Flood fill tool / Fill in the Selection with Color 3  #2cf1ff
Step 30
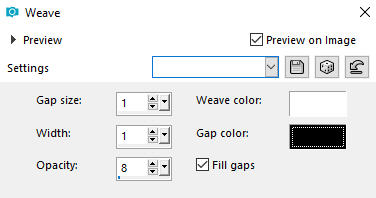
Effects - Texture Effects - Weave (colors white and black)
Step 31
Effects - Edge Effects - Enhance
Step 32
Selections - Select None
Step 33
Layers - Merge - Merge Down
Step 34
Layers - Duplicate
Step 35
Image - Resize - 75% - Resize All Layers - Not Checked
Step 36
Objects - Align - Right
Step 37
Layers - duplicate
Step 38
Objects - Align - Left
Step 39
Layers - Merge - Merge Down (2 times)
Step 40
Objects - Align - Top
Step 41
Layers - Duplicate
Step 42
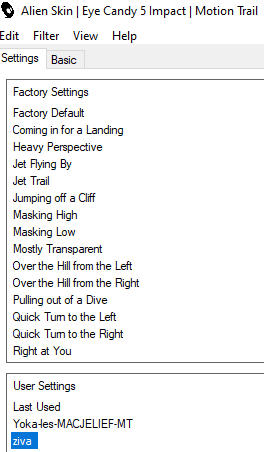
Effects - Plugins - Alien Skin Eye Candy 5 - Impact - Motion Trail
In the User Settings look for preset ziva provided in the materials and click OK
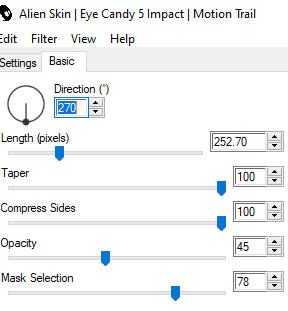
Note: If the Preset doesn't work for you, use these settings in the Basic Tab:
Step 43
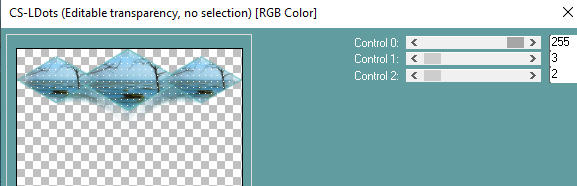
Effects - Plugins - Carolaine and Sensibility - CS-LDots
Step 44
Adjust - Sharpness- Sharpen
Step 45
In your Layer Properties - set the Blend mode to Dissolve
Step 46
Layers - Arrange - Move down
Step 47
Activate the top layer - Raster 2
Step 48
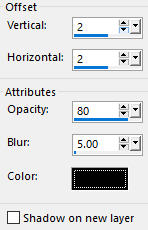
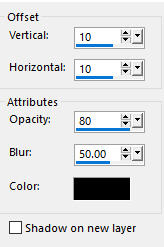
Effects - 3D Effects - Drop Shadow (2/2/80/5) color black #000000 - Shadow on new layer not checked
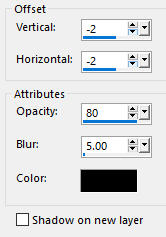
Repeat drop shadow with negative Vertical and Horizontal values (-2/-2/80/5)
Step 49
Layers - New Raster Layer
Step 50
Flood fill tool / Fill in the Selection with Color 3 #2cf1ff
Step 51
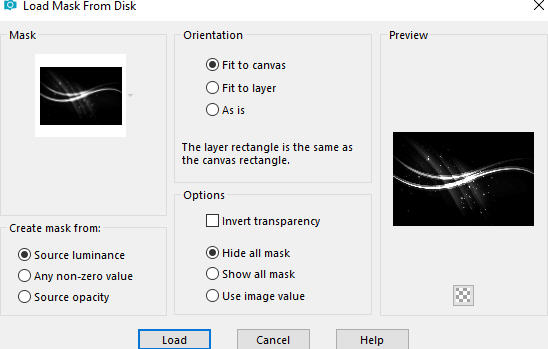
Layers - Load/Save Mask - Load Mask From Disk
Look for and load mask - Narah_mask_0295
Step 52
Layers - Merge - Merge Group
Step 53
Image - Mirror - Mirror Horizontal (older versions of PSP - Image Mirror)
Step 54
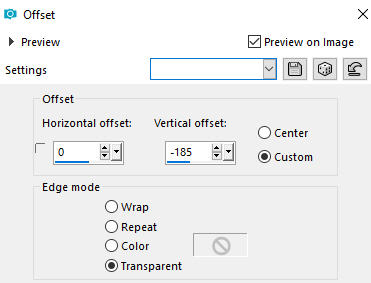
Effects - Image Effects - Offset
Step 55
Effects - Plugins - Carolaine and Sensibility - CS-LDots

Step 56
Adjust - Sharpness- Sharpen
Step 57
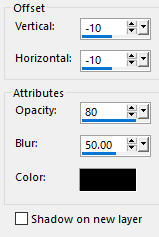
Effects - 3D Effects - Drop Shadow (-2/-2/80/5) color black #000000 - Shadow on new layer not checked
Step 58
Layer Properties - Activate the bottom layer - Raster 1
Close the visibility of the layer
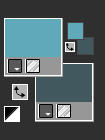
Your layers look like this:
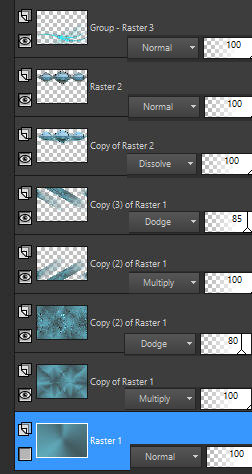
Activate the top layer
Step 59
Edit - Copy Special - Copy Merged
(Note: Edit - Paste As New Image - in case you don't lose it)
Step 60
Layer Properties - Open the visibility of the bottom Layer - Raster 1
Step 61
Image - Add Borders - 2px - Symmetric checked - Color 3 #2cf1ff
Image - Add Borders - 1px - Symmetric checked - Color 4  #ffffff
Image - Add Borders - 2px - Symmetric checked - Color 3 #2cf1ff
Step 62
Selections - Select All
Step 63
Image - Add Borders - 50px - Symmetric checked - Color 4 #ffffff
Step 64
Selections - Invert
Step 65
Selections - Promote Selection to Layer
Step 66
Edit - Paste Into Selection - the image from Step 59 (the image is still in memory)
Step 67
Adjust - Blur - Gaussian Blur (Radius 30)
Step 68
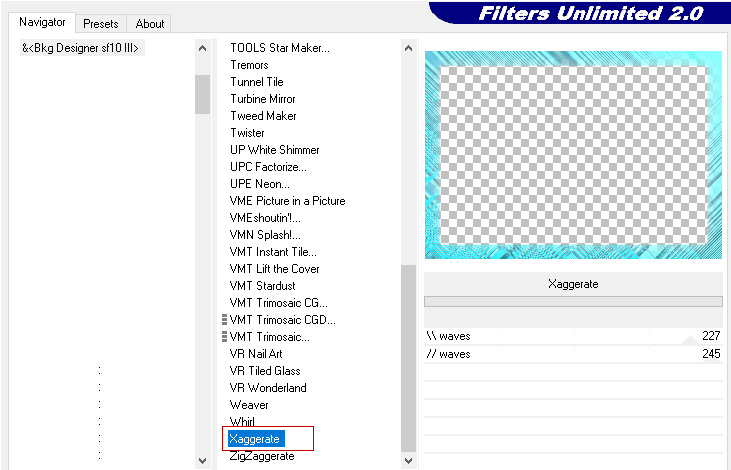
Effects - Plugins - <I.C.NET Software> - Filters Unlimited 2.0 - Bkg Designers sf10 III - Xaggerate (default settings)
Step 69
Layers - Duplicate
Step 70
Image - Mirror - Mirror Vertical (older versions of PSP - Image - Flip)
Step 71
Selections - Select None
Step 72
In your Layer Properties - set the Opacity of this layer to 50%
Step 73
Layers - Merge - Merge Down
Step 74
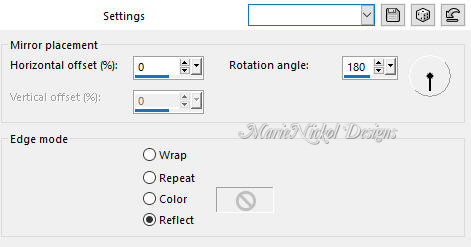
Effects - Reflection Effects - Rotating Mirror
Step 75
Layers - Merge - Merge Visible
Step 76
Selections - Select All
Step 77
Selections - Modify - Contract 50 pixels
Step 78
Effects - 3D Effects - Drop Shadow (10/10/80/50) color black #000000 - Shadow on new layer not checked
Repeat drop shadow with negative Vertical and Horizontal values (-10/-10/80/50)
Step 79
Selections - Select None
Step 80
Open tube - woman_diamant_crown_150320
Edit - Copy
Edit - Paste - Paste As New Layer on your working image
Step 81
Image - Resize - 90% - Resize All Layers - Not Checked
Step 82
Effects - Image Effects - Offset

Step 83
Adjust - One Step Photo Fix
Step 84
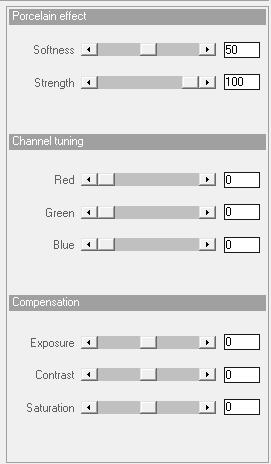
Effects - Plugins - Xero - Porcelain

If you use a newer version of Xero - Porcelain
Step 85
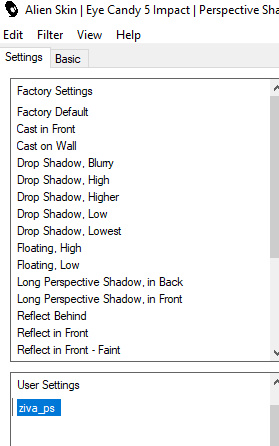
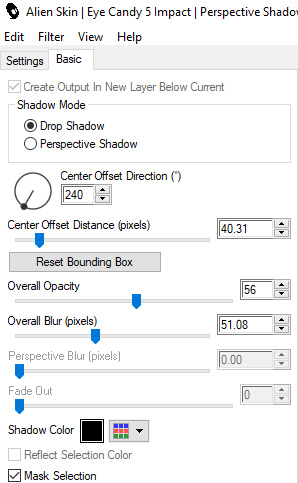
Effects - Plugins - Alien Skin Eye Candy 5 - Impact - Perspective shadow
In the User Settings look for preset ziva_ps provided in the materials and click OK
Note: If the Preset doesn't work for you, use these settings in the Basic Tab:
Step 86
Open tube - ziva_wa
Edit - Copy
Edit - Paste - Paste As New Layer on your working image
Position the text tube to your own liking
Step 87
Image - Add Borders - 2px - Symmetric checked - Color 3 #2cf1ff
Image - Add Borders - 1px - Symmetric checked - Color 4 #ffffff
Image - Add Borders - 2px - Symmetric checked - Color 3 #2cf1ff
Step 88
Layers - New Raster Layer
Add your name or watermark
Step 89
Image - Resize - 900 pixels width (the height will adapt)
File - Export - Save as JPG file
~~~~~~~
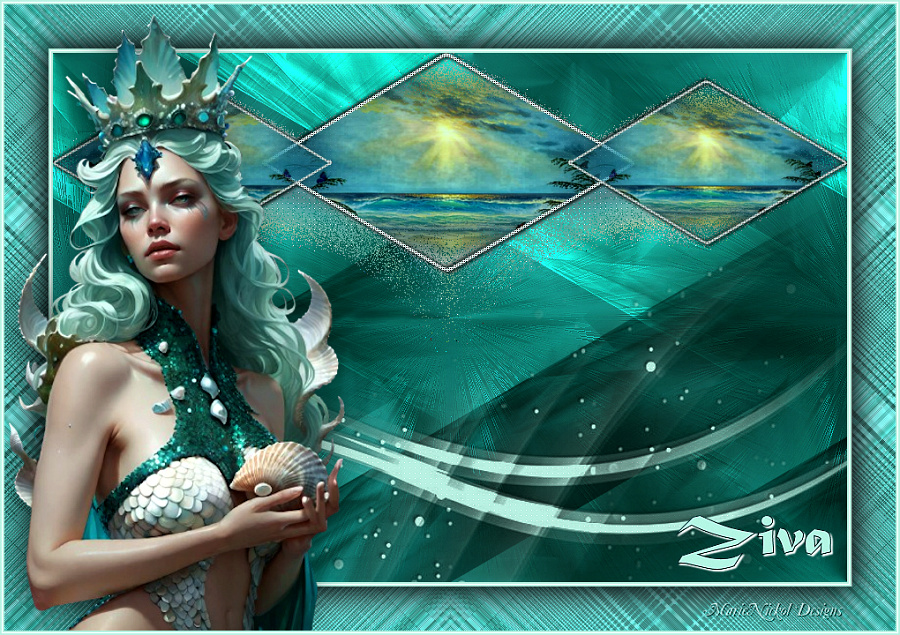
My version with my own tubes
~~~~~~~~~~
Your Versions
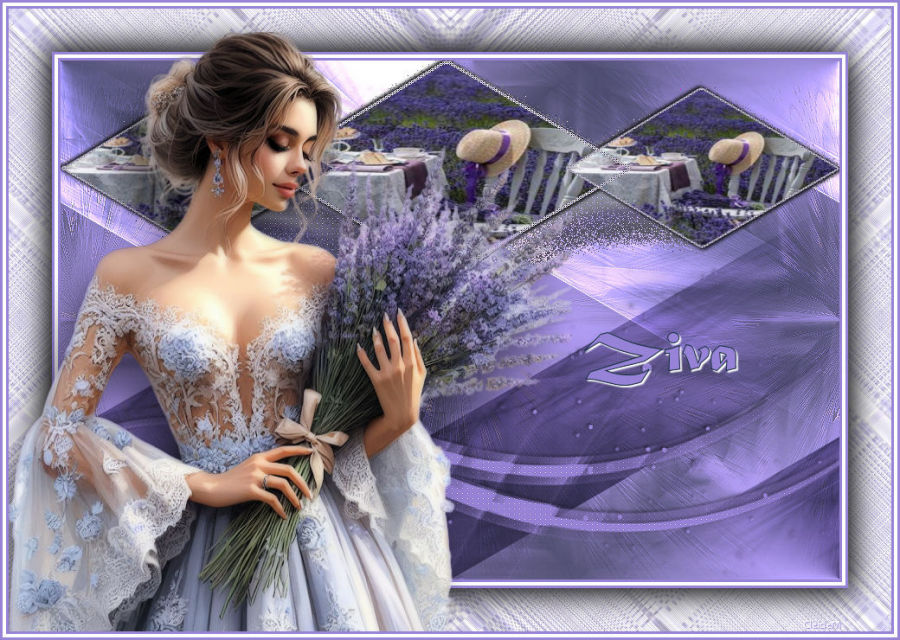
Thank you so much CleideM for your beautiful version
~~~~~~~~~~
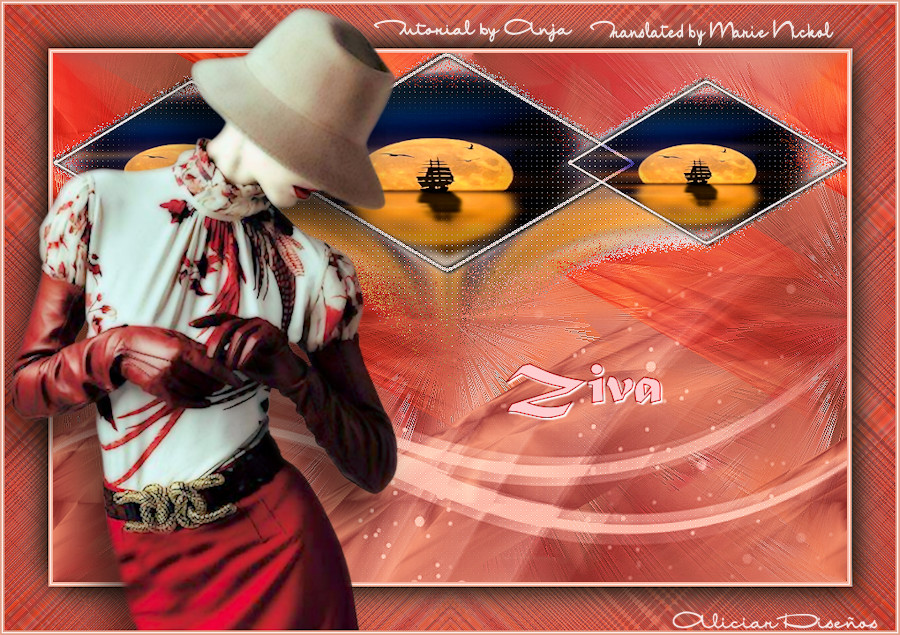
Thank you so much Alicia for your beautiful version
~~~~~~~~~~