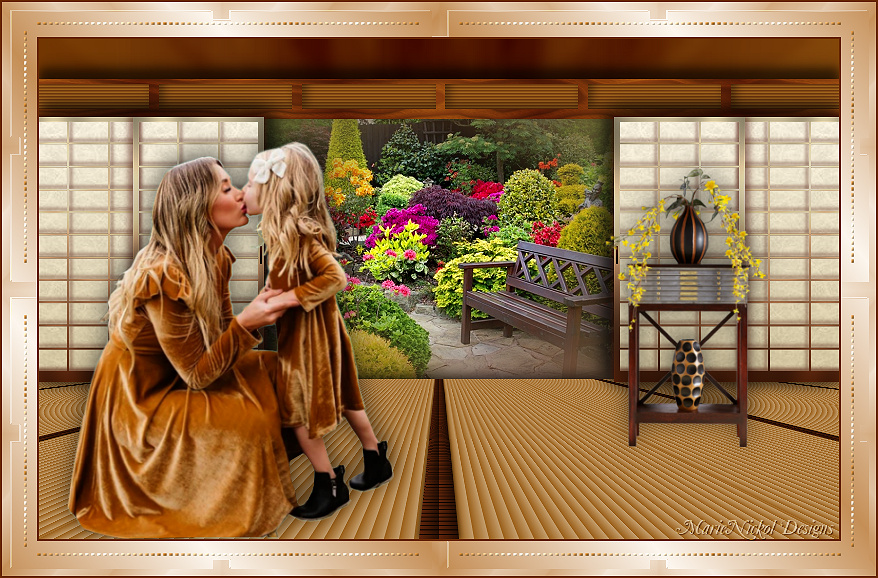
Original tutorial by Animabelle
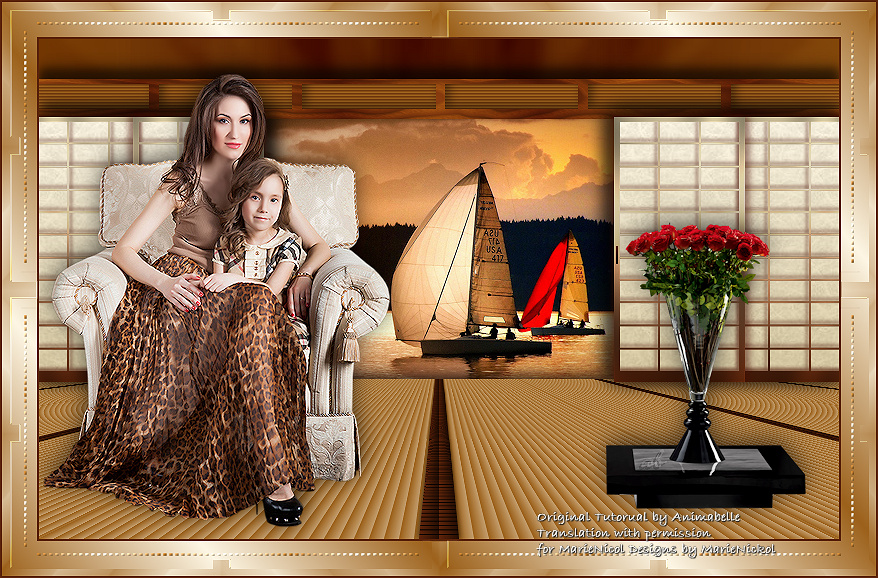
Thank you Animabelle for the permission to translate some of your tutorials.
Translated by Marie Nickol.
You will find the original tutorial here:

This tutorial is a personal creation.
Any resemblance with another one would only be pure coincidence.
Thank you for the respect of Animabelle’s work and the tubers work.
These translations are mine and are intended for personal use only and it is forbidden to copy part or all of it.
You can use this tutorial for PSP lessons but please put the link back to it.
Do not hesitate to let Animabelle or me know if you have any problem with the present tutorial.

Materials used:
Disclaimer: Modifying or renaming files or removing watermarks from the tubes of the original tubers provided in the materials and sharing them as your own or using them for sale online or otherwise is prohibited.
Important Note: To protect her rights to her work, Animabelle no longer provides her own tubes with the material.
You will need:
1 Character tube of your own
1 deco tube of your own
1 landscape image by Animabelle
2 Selections
1 deco cadre
Plugins used:
User Defined Filter / Emboss 3
I.C. NET Software/Filters Unlimited 2.0
Krusty's FX vol I 1.0 (imported into Filters Unlimited 2.0)
Toadies (It can be used alone or imported into Filters Unlimited 2.0)
Alien Skin / Eye Candy 5 - Impact
Alien Skin / Eye Candy 5 -Textures
Forrest's Filters (included in the materials - import the filters into Filters Unlimited 2.0)
Mura's Meister
Graphic plus (It can be used alone or imported into Filters Unlimited 2.0)
VM Toolbox (It can be used alone or imported into Filters Unlimited 2.0)
Thank you Renée for sharing your plugins page
==> Here
Materials

The original tutorial was written with PSP 12 but can be done with other versions as well.
This translation is written with PSP 2018 Ultimate, if you work with older versions some things might be different but the result will be the same.
Note: In the latest versions of PSP the command Image-Mirror has become Image - Mirror - Mirror Horizontal
and Image-Flip has become Image - Mirror - Mirror Vertical
Preparations
Duplicate all the tubes and work with the copies to preserve the originals.
Place the Selections into your Selections folder of PSP
Colors used:

Note: When
working with your own colors, adjust the Blend Mode/Opacity at your own discretion
The Lesson
Step 1
Open a new Transparent image 800 x 500 pixels
Material Properties - Foreground: Set your Foreground color to color 1  #9c611b
Material Properties - Background: Set your Background color to color 2  #5b230a
Material Properties - Foreground - Set your Foreground color to foreground-background style Linear gradient, with the following settings
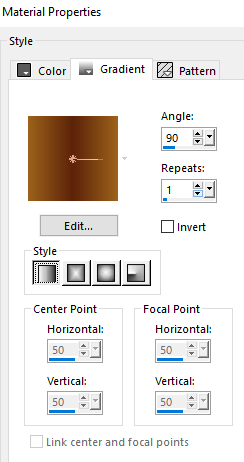
Flood fill tool / Fill in the layer with the above gradient
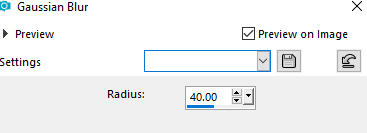
Adjust - Blur - Gaussian Blur (Radius 40)
Effects - Plugins - I.C. NET Software - Filters Unlimited 2 - Krusty's FX vol I 1.0 - Radial Texturiser
Use the following settings and click Apply
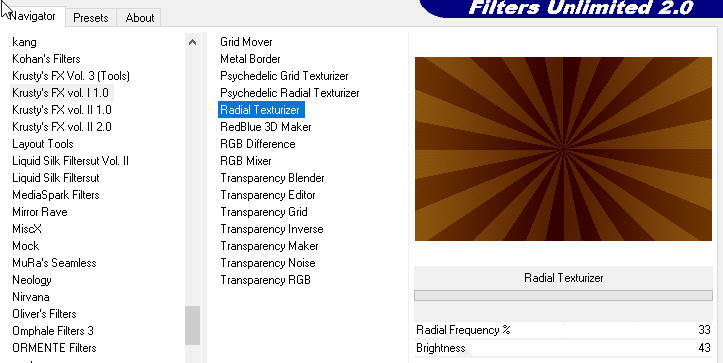
Adjust - Sharpness - Sharpen
Effects - Plugins - Toadies - What are you?

Adjust - Blur - Average (Filter aperture 15)
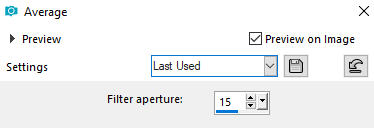
Step 2
Layers - New Raster Layer
Selection Tool (S)  - Custom Selection

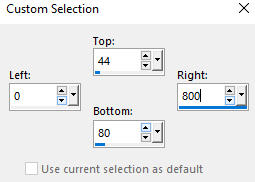
Flood fill tool /Fill in the Selection with the Foregound Color 1 #9c611b
Effects - Texture Effects - Blinds (color 2  #5b230a)
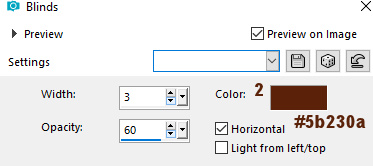
Step 3
Layers - New Raster Layer
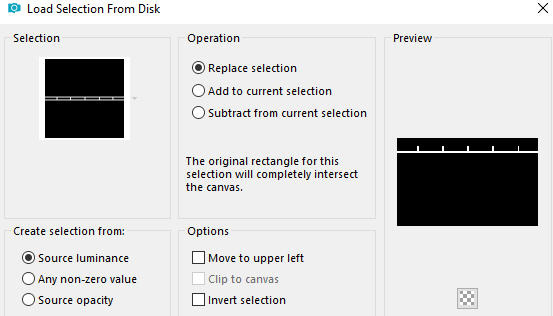
Selections - Load/Save Selection - Load Selection From Disk
Look for and load the selection - selection1_05_2014_animabelle
Material Properties - Foreground - Change the gradient to style Sunburst (Foreground color 1  #9c611b and Background color 2
  #5b230a) with the following settings
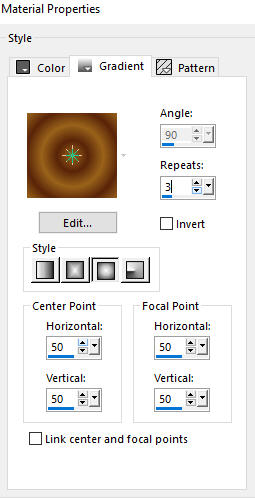
Flood fill tool /Fill in the Selection with the Sunburst gradient
Layers - New Raster Layer
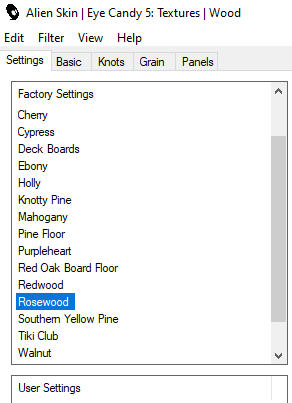
Effects - Plugins - Alien Skin - Eye Candy 5 - Textures - Wood
Settings - Rosewood
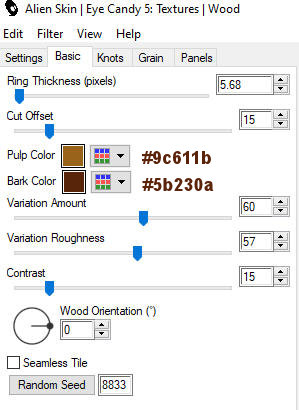
Use these settings in the Basic Tab: Pulp Color - color 1  #9c611b/ Bark Color - color 2
  #5b230a:
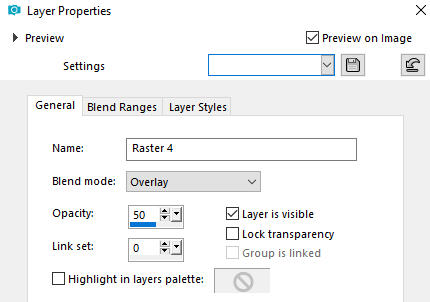
Layer Properties: Set the Blend Mode to Overlay and the Opacity to 50
Layers - Merge - Merge Down
Selections - Select None
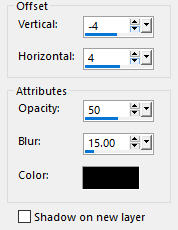
Effects - 3D Effects - Drop Shadow (- 4/4/50/15/) color 6  #000000 - Shadow on new layer not checked
Layers - Merge - Merge Down again
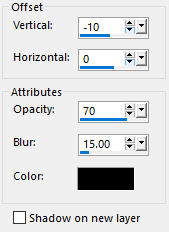
Effects - 3D Effects - Drop Shadow (-10/0/70/15) color 6  #000000 - Shadow on new layer not checked
Step 4
Flood fill tool / Fill in the layer with color 1 #9c611b
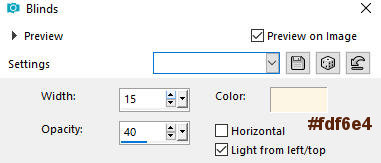
Effects - Texture Effects - Blinds (Horizontal not checked - color 4  #fdf6e4)
Layers - New Raster Layer
Selection Tool (S)  - Custom Selection

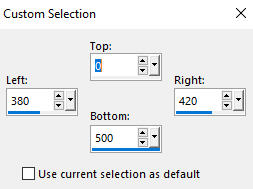
Flood fill tool / Fill in the Selection with color 2  #5b230a
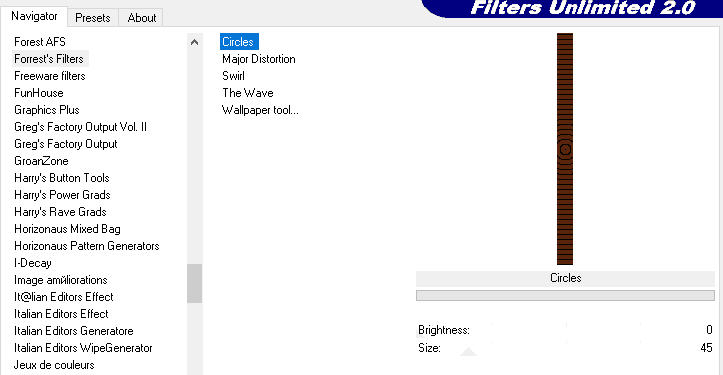
Effects - Plugins - I.C. NET Software - Filters Unlimited 2.0 - Forrest's Filters - Circles (default settings)
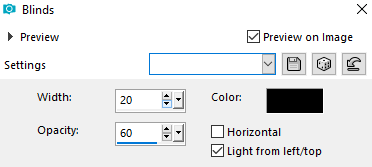
Effects - Texture Effects - Blinds (Horizontal not checked color 6  #000000)
Selections - Select None
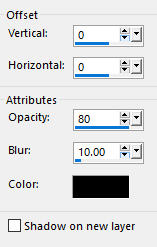
Effects - 3D Effects - Drop Shadow (0/0/80/10) color #000000 - Shadow on new layer not checked
Layers - Merge - Merge Down
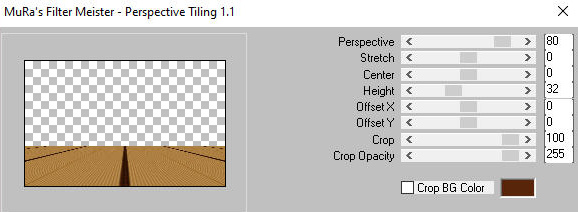
Effects - Plugins - Mura's Meister - Perspective Tiling
Step 5
Material Properties - Foreground: Set your Foreground color to color 3  #dacca5
Material Properties - Background: Set your Background color to color 4  #fdf6e4

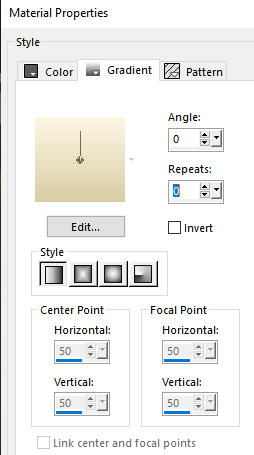
Material Properties - Foreground - Set your Foreground color to foreground-background style Linear gradient, with the following settings
Layers - New Raster Layer
Selection Tool (S) - Custom Selection

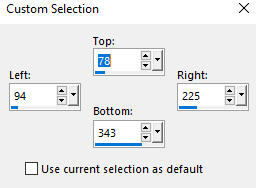
Flood fill tool / Fill in the Selection with gradient prepared above
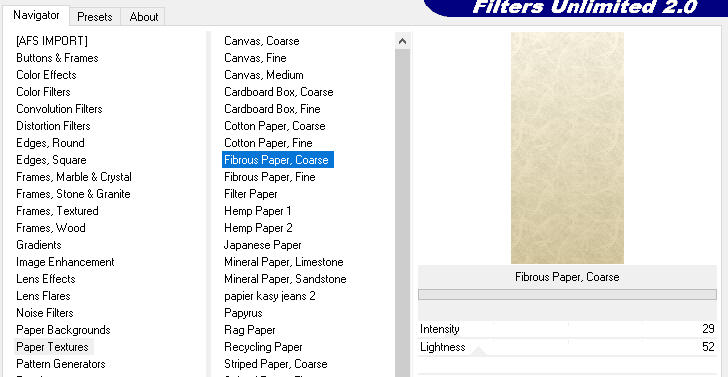
Effects - Plugins - I.C. NET Software - Filters Unlimited 2.0 - Paper Textures - Fibrous Paper, Coarse
Step 6
Layers - New Raster Layer
Selections - Load/Save Selection - Load Selection From Disk
Look for and load the selection - selection2_05_2014_animabelle
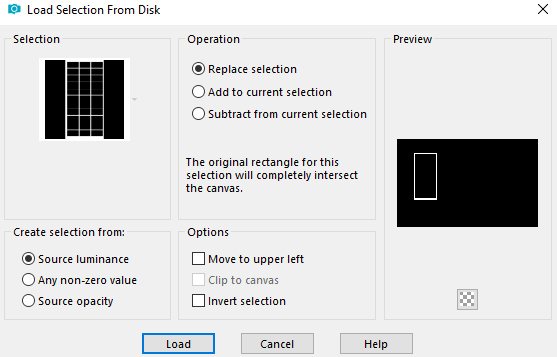
Material Properties - Foreground: Set your Foreground color to color 2  #5b230a
Material Properties - Background: Set your Background color to color 3  #dacca5
Material Properties - Foreground - Set your Foreground color to foreground-background style Linear gradient, with the following settings
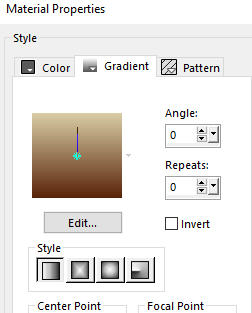
Flood fill tool / Fill in the Selection with gradient you have just prepared
Selections - Promote Selection to Layer
Effects - Plugins - Graphic plus - Cross shadow - default settings (this plugin can also be imported into Filters Unlimited 2.0)

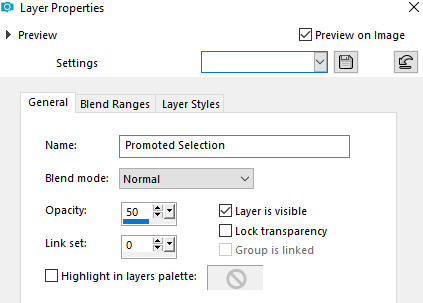
Layer Properties: Set the Opacity to 50
Your Layers look like this:
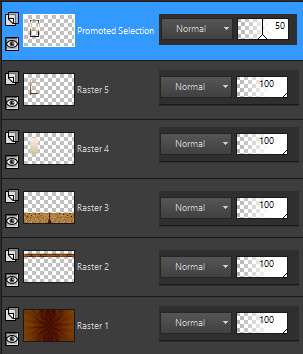
Selections - Select None
Adjust - Sharpness - Sharpen
Layers - Merge - Merge Down
Effects - 3D Effects - Drop Shadow (-3/3/60/ 5) color 5  #450c00 - Shadow on new layer not checked
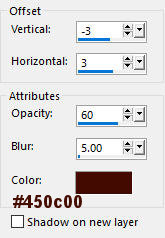
Layers - Merge - Merge Down
Step 7
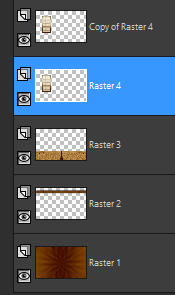
Layers - Duplicate
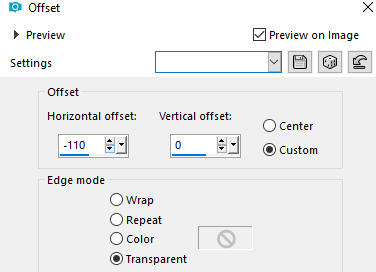
Activate the layer below - Raster 4
Effects - Image effects - Offset
Activate the top layer - Copy of Raster 4
Effects - 3D Effects - Drop Shadow (0 /-5/50/10) color 5  #450c00 - Shadow on new layer not checked
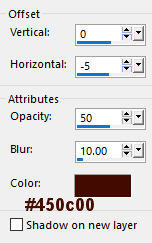
Layers - Merge - Merge Down
Layers - Duplicate
Image - Mirror
Layers - Merge - Merge Down
Effects - 3D Effects - Drop Shadow (0/8/70/20) color 6  #000000 - Shadow on new layer not checked
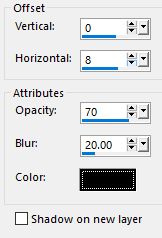
Repeat Drop Shadow with Horizontal negative (-8)
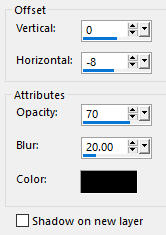
Layers - Merge - Merge Down
Your layers look like this:
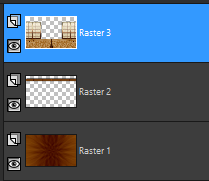
Effects - 3D Effects - Drop Shadow (-4/0 /70/20 ) color 6  #000000 - Shadow on new layer not checked
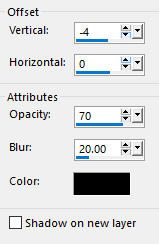
Layers - Merge - Merge Down
Step 8
Layers - New Raster Layer
Selection Tool (S) - Custom Selection

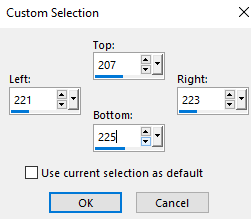
Material Properties - Foreground: Set your Foreground color to color 6  #000000
Material Properties - Background: Set your Background color to color 2  #5b230a
Material Properties - Foreground - Set your Foreground color to foreground-background style Linear gradient, with the following settings
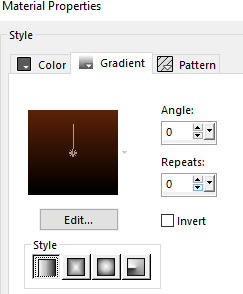
Flood fill tool / Fill in the Selection with gradient you have just prepared
(Note: you may have to Zoom the working image to fill in the layer)
Selections - Select None
Layers - Duplicate
Image - Mirror
Layers - Merge - Merge Down (2 times)
Step 9
Layers - New Raster Layer
Selection Tool (S)  - Custom Selection

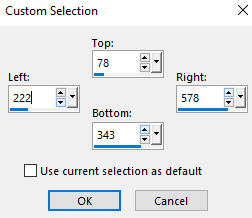
Open your landscape image (Note: use one of your own)
(Important Note: the size of your landscape image should be 356/265 pixels so that it is not distorted)
Edit - Copy
Edit - Paste - Paste into Selection on your working image
Selections - Select None
Layers - Arrange - Move down
Step 10
Activate the top layer Raster 2
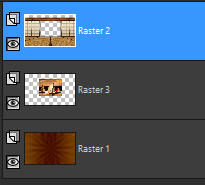
Open your character tube
Edit - Copy
Edit - Paste - Paste As New Layer on your working image
Rezise if needed
Move the tube to the left as shown in the final result
Effects - Plugins - Eye Candy 5 - Impact - Perspective Shadow
Settings: Drop Shadow, Blurry / Basic Tab: as shown below
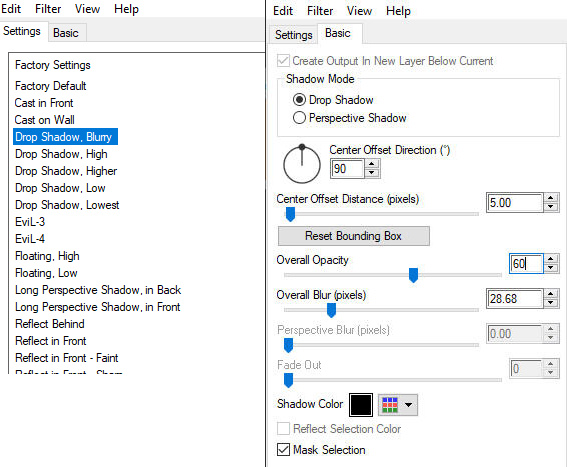
Step 11
Open your deco tube (Animabelle's tube is a vase with roses and it is not included in the materials)
Edit - Copy
Edit - Paste - Paste As New Layer on your working image
Rezise if needed
Move the tube to the right as shown in the final result
Effet / Alien Skin / Eye Candy 5 - Impact / Perspective shadow
Use the same settings as above (the settings are still in memory)
Step 12
Image - Add Borders - 2 px - Symmetric checked color 2  #5b230a
Image - Add Borders - 35 px - Symmetric checked color 1 #9c611b
Activate the Magic Wand tool  (Tolerance 0 and Feather 0) and select the 35 px border
Material Properties - Foreground: Set your Foreground color to color 1  #9c611b
Material Properties - Background: Set your Background color to color 4  #fdf6e4
Material Properties - Foreground - Set your Foreground color to foreground-background style Linear gradient, with the following settings
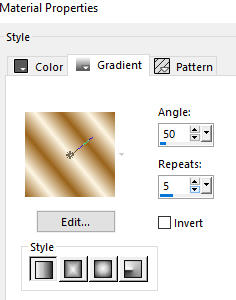
Flood fill tool / Fill in the selected border with gradient you have just prepared
Note: You can adopt the colors of the gradient according to your color scheme preference
Selections - Promote Selection to Layer
Effects - Plugins - VM Toolbox - Instant Tile (default settings)

Edit - Repeat Instant Tile
Layer Properties: Set the Opacity to 40
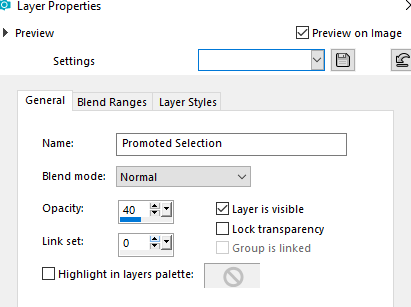
Effects - User Defined Filter - Emboss 3
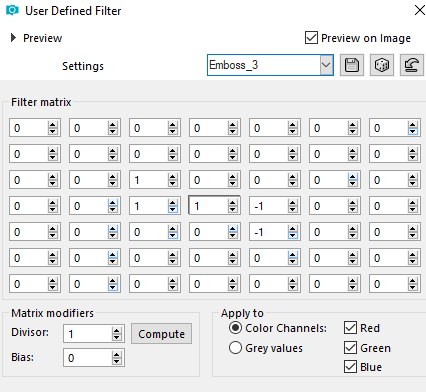
Selections - Select None
Step 13
Open tube - deco_cadre_animabelle
Edit - Copy
Edit - Paste - Paste As New Layer on your working image
Do not move it - it is in the right place
Image - Add Borders - 2px - Symmetric checked color 2  #5b230a
Adjust - Sharpness - Sharpen
Add your name or watermark, resize if you wish, and save as JPG file
~~~~~~~
My version with my own tubes and deco vase by Azalee
