Original tutorial by Animabelle
Thank you Animabelle for the permission to translate some of your tutorials.
Translated by Marie Nickol.
You will find the original tutorial here:

This tutorial is a personal creation.
Any resemblance with another one would only be pure coincidence.
Thank you for the respect of Animabelle’s work and the tubers work.
These translations are mine and are intended for personal use only and it is forbidden to copy part or all of it.
You can use this tutorial for PSP lessons but please put the link back to it.
Do not hesitate to let Animabelle or me know if you have any problem with the present tutorial.

Materials used:
Disclaimer: Modifying or renaming files or removing watermarks from the tubes of the original tubers provided in the materials and sharing them as your own or using them for sale online or otherwise is prohibited.
1 tube - Karine Dreams
1 tube - Tony Chavarria
1 mask - Aditas creations
1 texture
Plugins used:
Alien Skin Eye Candy 5 - Textures / Texture Noise
Déformation / Splash 2
Thank you Renée for sharing your plugins page
==> Here
Materials

The original tutorial was written with PSP 12 but can be done with other versions as well.
This translation is written with PSP 2018 Ultimate, if you work with other versions some things might be different but the result will be the same.
Note: In the latest versions of PSP the command Image-Mirror has become Image - Mirror - Mirror Horizontal
and Image-Flip has become Image - Mirror - Mirror Vertical
Preparations
Duplicate all the tubes including the masks and work with the copies to preserve the originals.
Place the texture into your Textures folder of PSP
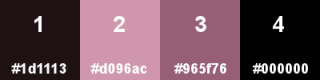
Colors used:
Note: When
working with your own colors, adjust the Blend Mode/Opacity at your own discretion
Material Properties - Foreground: Set your Foreground color to color 1  #97370f
Material Properties - Background: Set your Background color to color 2  #eab981
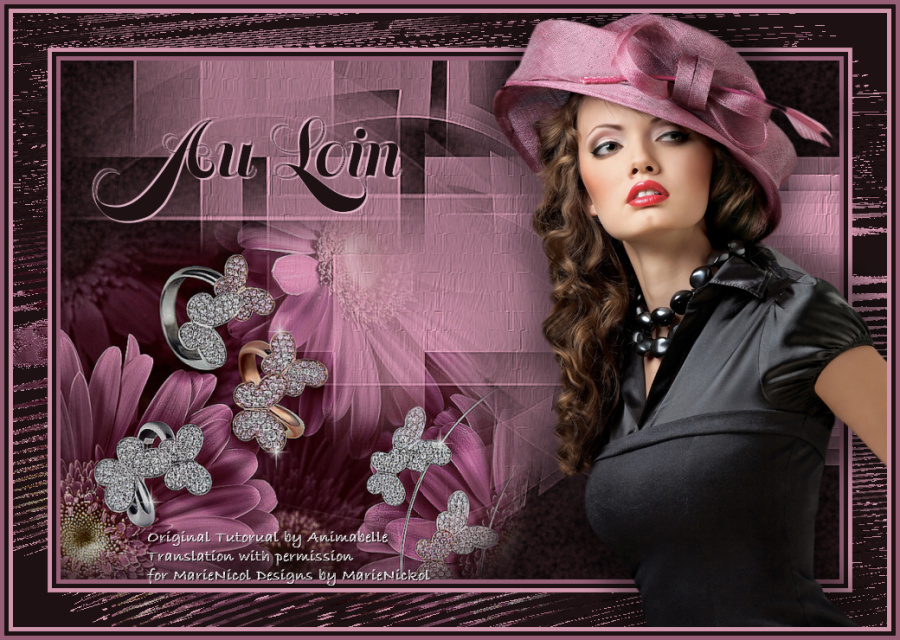
The Tutorial
Step 1
File - New - Open a new Transparent image 900 x 600 pixels
Flood fill tool  / Fill in the layer with your foreground color - Color 1 #1d1113
Effects - Plugins - Eye Candy 5 - Textures - Texture Noise (Default settings)
Step 2
Layers - New Raster Layer
Flood fill tool / Fill in the layer with your foreground color - Color 2 #d096ac
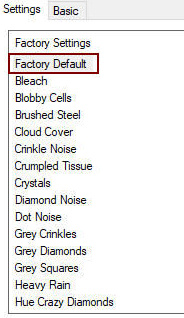
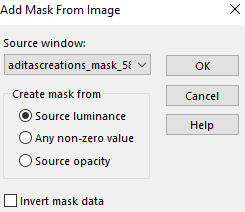
Open mask - aditascreations_mask_58
Layers - New Mask Layer - From Image (Invert mask data not checked)
Layers - Merge - Merge Group
Layers - Duplicate
Layers - Merge - Merge Down
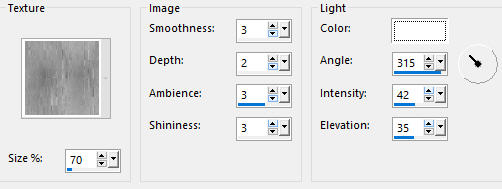
Effects - Texture Effects - Texture
Look for and apply winni.texture.8 with the following settings
Adjust - Sharpness- Sharpen More
Step 3
Activate the bottom layer - Raster 1
Open tube Tocha24140
Edit - Copy
Edit - Paste - Paste As New Layer on your working image
Image - Resize - 85% - Resize All Layers - Not Checked
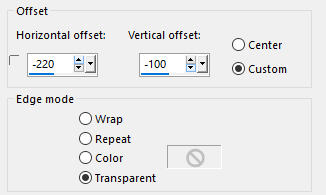
Effects - Image Effects - Offset
Adjust - Sharpness- Sharpen
Layer Properties - set the Opacity of this layer on 90
Step 4
Image - Add Borders - 5px - Symmetric checked - Color 3  #965f76
Image - Add Borders - 5px - Symmetric checked - Color 1 #1d1113
Image - Add Borders - 5px - Symmetric checked - Color 2 #d096ac
Image - Add Borders - 40px - Symmetric checked - Color 1 #1d1113
Activate the Magic Wand  (Tolerance 0 and Feather 0)
Select the last 40px border
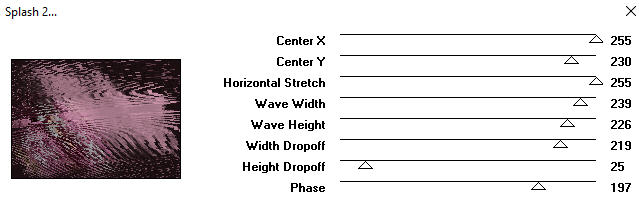
Effects - Plugins - Déformation - Splash 2
Selections - Select None
Step 5
Open the lady tube - k@rine_ dreams _Lady_Hat_1416_Janvier_2011
Edit - Copy
Edit - Paste - Paste As New Layer on your working image
Pick Tool (K) - Move the tube to the right as shown on the final result
Note: If you have the option on your PSP program - Object - Align - Right
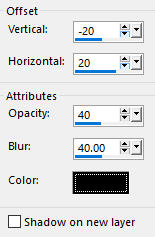
Effects - 3D Effects - Drop Shadow - (-20/20/40/40) - Shadow on new layer not checked - Color 4  #000000
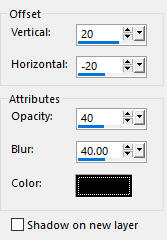
Effects - 3D Effects - Drop Shadow - (20/-20/40/40) - Shadow on new layer not checked - Color 4 #000000
Step 6
Materials Properties: Set your Backgroundcolor to color 1 #1d1113
Activate the Text Tool (T)
With a font of your own choice type Au Loin - or a text of your own
Animabelle used font Memorian Pro Headine size 72 pixels

Layers - Convert to Raster Layer
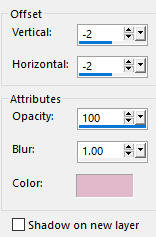
Effects - 3D Effects - Drop Shadow - (2/2/100/1) - Shadow on new layer not checked - Color #e3b8ca
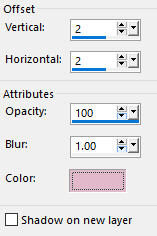
Repeat Drop Shadow with negative values
Effects - 3D Effects - Drop Shadow - (-2/-2/100/1) - Shadow on new layer not checked - Color #e3b8ca
Pick Tool (K) - Move the text to the top left as shown on the final result
Step 7
Image - Add Borders - 5px - Symmetric checked - Color 2 #d096ac
Image - Add Borders - 5px - Symmetric checked - Color 1 #1d1113
Image - Add Borders - 5px - Symmetric checked - Color 3 #965f76
Step 8
Layers - New Raster Layer
Add your name or watermark
Layers - Merge - Merge All (Flatten)
Optional: Image - Resize - 900 pixels width (the height will adapt)
File - Export - Save as JPG file
~~~~~~~
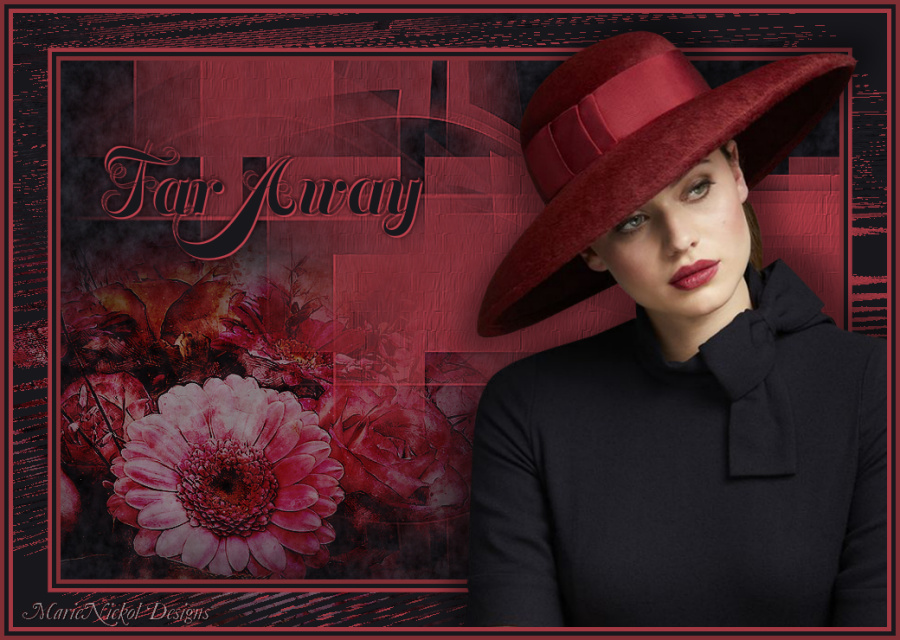
My version with lady tube by Leny and misted flowers by Lana